FATHER'S DAY SALE | 15% OFF WITH CODE DADDAY15 | Offer Details
Skip to content
  • Our Custom Picture Framing and Printing Materials

    May 03, 2023

    Quality materials are essential for preserving and displaying your most treasured memories and artwork. At CustomPictureFrames.com, we take great pride in our craftsmanship and hold our materials to the highest standards. Our materials should exceed your expectations and ensure your cherished artwork lasts years. Let's take a closer look at the materials we use and how they contribute to the quality of our finished products.

    The Mouldings

    Our frames are crafted from solid wood, which makes them strong and sturdy. You won't find any imitation wood or polystyrene options in our inventory. Our frames come in various styles, and you can even see the beautiful wood grain shining through the high-quality finishes in some styles. We understand that every artwork piece is unique and important, so we offer a vast selection of moulding options for you to choose from.

    The Matting

    Adding a mat to your picture frame gives it a refined finish. Our mat boards come in various colors and are 4-ply and 8-ply thick to fit your needs. We offer customization options, including single, double, or triple mats. You can even choose a mat with different textures, such as suede, basketball, and football. Adding a mat can protect your artwork from glass or acrylic and provide visual depth to your piece.

    The Backing

    The right backing is crucial to completing your artwork package. We include an acid-free 3/16” thick white foam core board with your frame to keep the artwork in place while protecting it. An acid-free backing can prevent your artwork from yellowing or deteriorating over time.

    The Prints

    We offer printing services that bring your favorite art or photograph to life. You can upload your photo or image file anywhere and choose between our paper and canvas options. We print on only the best archival paper and canvas, ensuring your print lasts for years. Our high-quality prints will shine in our frames, and you can proudly display your artwork.

    The Glass

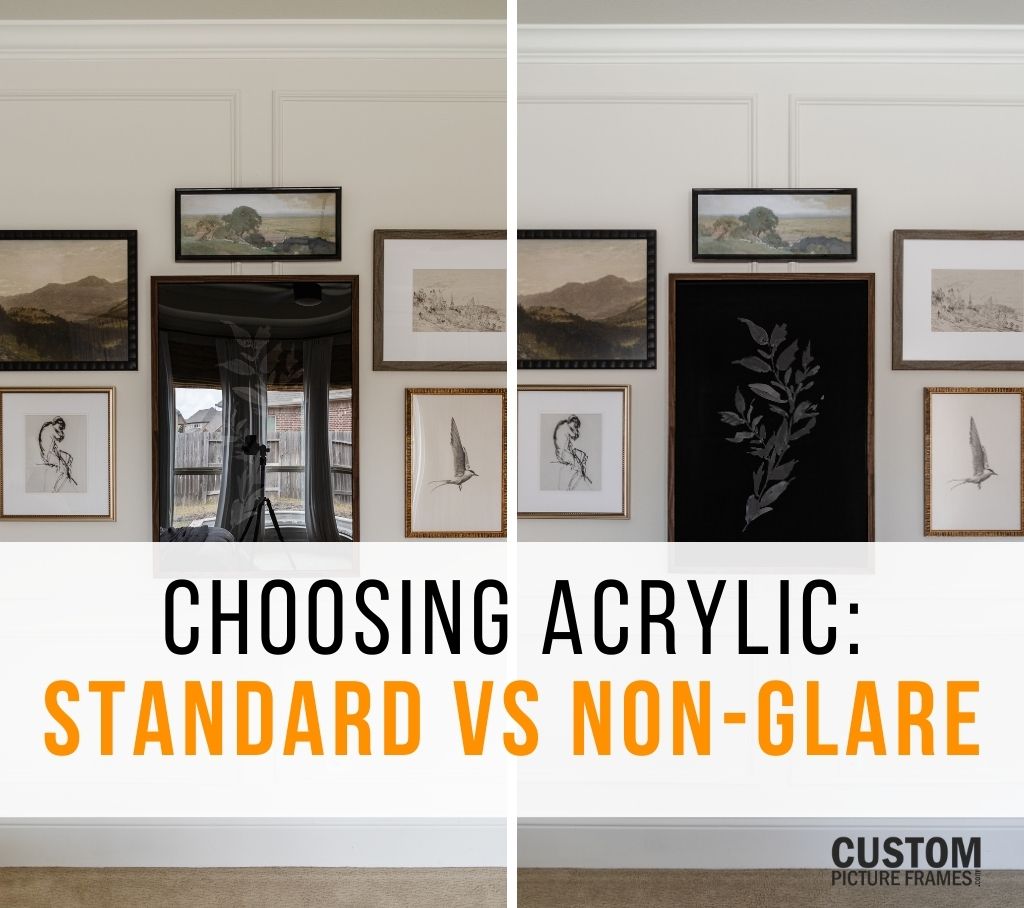
    We use frame-grade acrylic instead of glass in our picture frames and shadow boxes. Acrylic is shatter-resistant, lightweight, and less expensive than glass, making it a more practical choice for our customers. We offer standard frame-grade and non-glare acrylic, which provide UV protection to help preserve and protect your images and art from light damage. Our non-glare acrylic is an excellent option for hanging artwork near a light source to eliminate glare.

    The Inks

    Our high-quality printing services start with our archival inks, which are resistant to weathering and fading. These inks ensure that your artwork or photograph will look stunning for years to come. No matter what file we print for you, you will receive a product that fits the fine art world.

    The Packaging

    We understand the importance of ensuring that our handcrafted frames are delivered to you in pristine condition. Therefore, we designed and manufactured our boxes to minimize damage during transit. These specially-engineered boxes are also sustainably sourced and produced, contributing to our commitment to environmental responsibility.

    At our framing and printing shop, we take great care to use only the highest quality materials to ensure that your cherished artwork lasts for years. From our solid wood mouldings to our archival inks, we believe that every component of our products should be of the highest quality. When you choose us for your custom framing and printing needs, you can rest assured that your artwork is in good hands.


    About The Author

    Brittany DeMauro Headshot Brittany DeMauro is the Creative Director here at CustomPictureFrames.com. With a background in creative writing and a passion for all things DIY, you'll find her in the shop crafting content. She can always find space for a fun gallery wall and loves discovering new artists to display around her home (in custom frames, of course!) When she's not creating content for our brand, she can most likely be found binging shows on Netflix with her two cats.
  • How To Frame A Comic Book

    April 26, 2023

    Comic books are more than just a source of entertainment - they are a beloved piece of pop culture history. And for many fans, collecting and preserving comic books is a passion. One way to display and protect these treasured items is by framing them. Framing comic books allows for easy display and protects them from damage caused by handling, exposure to light, and other environmental factors. But framing comic books can be daunting, especially for those new to the world of comic book collecting. In this blog post, we will explore the ins and outs of framing comic books, from choosing the right frame to protecting your valuable collection.

    Comic books contain so much more value than just their storylines.  Some hold fond memories.  Maybe you’ve saved them since childhood and don’t want to let them go.  Or, you saw investment potential and bought them as a collector.  In either case, it's important to remember that paper won’t last forever. Without proper protection, time and constant handling will take their toll.

    Comic books are works of art, and art looks great in a frame.  Their unique style of artwork catches the eye and conjures memories of childhood.  That’s why it’s becoming more popular to take them out of the box in the back of the closet to preserve them and put them on display.

    With over three hundred real wood mouldings in our inventory, we can create the perfect frames for your favorite comic books.  You can display your comic books from single comics to a collage of your most prized issues while keeping them protected from the elements.

    Choose from our standard or non-glare frame-grade acrylic that both offer UV protection.  The four- and eight-ply matting and thick, white foam backing in our comic book frames are acid-free.  Even our shipping boxes are specially engineered and SFI-certified.

    how to frame comic books

    Here are the general steps to framing comic books:

    Choose the right frame

    Selecting the right frame is crucial when framing comic books. Look for a frame that is the right size for your comic book, with a depth of at least 1 inch to accommodate the book's thickness. You can choose between metal or wooden frames, depending on your preference and the style of your collection.

    Choose the right matting

    The right matting can enhance your comic book's appearance while protecting it from direct contact with the glass. Choose an acid-free mat board that matches the size of your comic book.

    framing your comic books

    Prepare the comic book

    Before framing it, ensure it is clean and free of debris or fingerprints. If your comic book has any tears or other damage, you may want to consider repairing it before framing.

    Mount the comic book

    Use acid-free mounting corners or strips to secure your comic book to the mat board. Be sure to place the corners or strips in a way that doesn't cover any important parts of the comic book.

    how to frame comic book

    Add backing board

    Once your comic book is mounted and secured, add a backing board to protect the back of the book. Use an acid-free foam board cut to the size of the frame.

    Add glass or plexiglass

    Add glass or plexiglass to your frame to protect your comic book from dust, dirt, and other environmental factors. Use UV-protective glass or plexiglass to prevent fading and damage caused by exposure to light.

    display your comic books in frames

    Seal the frame

    Once everything is in place, seal the frame with tape or backing paper to prevent dust or debris from entering the frame.

    Following these steps, you can create a beautiful, protective display for your treasured comic book collection.


    About The Author

    Brittany DeMauro Headshot Brittany DeMauro is the Creative Director here at CustomPictureFrames.com. With a background in creative writing and a passion for all things DIY, you'll find her in the shop crafting content. She can always find space for a fun gallery wall and loves discovering new artists to display around her home (in custom frames, of course!) When she's not creating content for our brand, she can most likely be found binging shows on Netflix with her two cats.
  • How To Clean Your Picture Frames

    April 19, 2023

    Cleaning picture frames may seem simple, but it's more involved than you think. Dust, dirt, and grime can accumulate on frames over time, making them look dull and dingy. Additionally, if you're dealing with antique or fragile frames, you'll want to take extra care to avoid causing any damage. Cleaning picture frames may seem daunting, but it can be an easy and rewarding process with the right tools and techniques. In this guide, we'll walk you through the step-by-step process of how to clean picture frames properly.

    cleaning supplies for cleaning picture frames

    Materials Needed

    Before we get started, you'll need a few materials. Here's what you'll need:

    • Soft-bristled brush or feather duster
    • Microfiber cloth or a soft, lint-free cloth
    • Bucket of warm water
    • Mild dish soap
    • Soft-bristled toothbrush (optional)
    • Compressed air can (optional)
    • Glass cleaner (optional)

    Types of Picture Frames

    Before you start cleaning your picture frame, it's important to understand the type of frame you have. Different types of frames require different cleaning supplies and techniques, and using the wrong technique can cause damage.

    Wooden Frames

    Wooden frames are the most common type of picture frame. They're often painted or stained and can have intricate designs or carvings. When cleaning a wooden frame, you'll want to avoid using too much water or harsh chemicals that could damage the finish.

    Metal Frames

    Metal frames can be made of various materials, such as brass, copper, or aluminum. They can be polished or brushed, and may also have intricate designs. When cleaning a metal frame, you'll want to avoid using abrasive materials that could scratch the metal.

    Plastic Frames

    Plastic frames are lightweight and affordable. They can come in various colors and designs. When cleaning a plastic frame, avoid using harsh chemicals that could cause the plastic to discolor or degrade.

    Antique Frames

    Antique frames require extra care when cleaning. These frames are often fragile, and the materials used to make them may not withstand traditional cleaning methods. If you're unsure how to clean an antique frame, consult a professional.

    how to clean picture frames

    Step-by-Step Cleaning Process

    Now that you have your materials and understand the type of frame you're cleaning, let's walk through the step-by-step cleaning process:

    Step 1: Preparation

    Start by removing the picture from the frame. Lay the picture flat on a clean surface, avoiding areas where dust or debris may be present.

    Step 2: Dusting

    Gently remove any dust or debris from the frame using a soft-bristled brush or feather duster. Be sure to get into all the crevices and corners of the frame.

    Step 3: Washing

    Fill a bucket with warm water and a small amount of mild dish soap. Dip a soft, lint-free cloth into the water and wring out the excess water. Gently wipe down the frame, avoiding any areas with intricate designs or carvings. Use a soft-bristled toothbrush to scrub any stubborn dirt or grime gently.

    Step 4: Drying

    Using a clean, dry microfiber cloth, gently pat the frame dry. Avoid using too much pressure or rubbing too hard, which could damage the finish.

    Step 5: Finishing Touches

    If any remaining areas need cleaning, use a compressed air can to blow away any remaining dust or debris. If the frame has glass, you can use glass cleaner and a clean, lint-free cloth to clean the glass.

    tips for maintaining picture frames

    Tips for Maintaining Picture Frames

    Once you've cleaned your picture frame, you'll want to take steps to maintain it. Here are a few tips:

    • Dust your picture frames regularly to avoid the buildup of dirt and grime.
    • Avoid using harsh chemicals or abrasive materials on your frames.
    • Don't hang picture frames in areas where they'll be exposed to direct sunlight or moisture.
    • If you're dealing with antique frames, consult a professional before cleaning them.

    Regular maintenance is crucial when it comes to cleaning picture frames. Picture frames can collect dust and grime over time, and if left unattended, it can cause damage to the frame's finish or even the picture itself. Regularly dusting and cleaning your picture frames can prevent a buildup of dirt and grime, ensuring that your frames look their best and last for years to come. Additionally, maintaining your frames can help prevent any potential damage from occurring during the cleaning process, as regular upkeep can help keep your frames in good condition. By taking care of your picture frames, you can enjoy your favorite memories on display without worrying about the frame's condition.

    Cleaning picture frames is important to maintain their appearance, prevent damage, and preserve your favorite memories. Regular maintenance is crucial to prevent a buildup of dirt and grime and ensure that your frames last for years. Different picture frames require different cleaning techniques, so it's important to understand your frame type before starting the cleaning process. In addition to cleaning, regularly dusting your picture frames and avoiding harsh chemicals or excessive water can help keep them in good condition.

    tips for cleaning picture frames

    For final tips and recommendations, here are a few things to keep in mind:

    1. Avoid using excessive water or harsh chemicals when cleaning your picture frames, as this can cause damage.
    2. When cleaning antique frames, consult a professional to ensure you don't cause any damage.
    3. Dust your picture frames regularly to avoid a buildup of dirt and grime.
    4. If you have glass in your picture frame, use a clean, lint-free cloth and glass cleaner to avoid streaks or damage.

    By following these tips and regularly cleaning and maintaining your picture frames, you can keep them looking great and protect your precious memories.


    About The Author

    Brittany DeMauro Headshot Brittany DeMauro is the Creative Director here at CustomPictureFrames.com. With a background in creative writing and a passion for all things DIY, you'll find her in the shop crafting content. She can always find space for a fun gallery wall and loves discovering new artists to display around her home (in custom frames, of course!) When she's not creating content for our brand, she can most likely be found binging shows on Netflix with her two cats.
  • 10+ Cricut Home Décor Projects

    January 24, 2023

    Did you recently get a Cricut machine and need some inspiration on how to use it to make things for your home? We’ve got you! Whether it’s a framed piece you want to display for years to come, seasonal projects you throw on a mantle for a holiday or beautiful gifts to pass to someone you love, here are 10+ Cricut home décor project ideas to get you started. Check out these different Cricut techniques using cardstock, vinyl and mixed media materials.

    Winter Initial Cricut Door Wreath

    American Flag Cricut Shadow Box

    • Vinyl on shadow box front. Fill your shadow box with photos, shells, flowers, corks or memorabilia and add a phrase using adhesive vinyl cut on your Cricut machine. Try this technique for seasonal décor on your mantle, like this stars and stripes design, or turn it into front door décor stating your family’s last name.

    Scarecrow Triptych Shadow Box Cricut Project

    • Multi-media shadow box art. Combine the technique mentioned above of adding vinyl on a shadow box front, but step it up a notch and add other mixed media elements on the outside too. These DIY Scarecrow Shadow Boxes have the most adorable button-nose faces paired with crowns of artificial flowers and would look cut on a shelf this fall.

    Grinch Heart Christmas Decor Cricut Idea

    Paper Rainbow Heart Shadow Box

    • Cardstock creations. Choose a single shape and cut concentric pieces or the same-sized pieces out of different colors of cardstock and add them to your frame. Tip: choose dimensional foam adhesive and create additional dimension, which is especially effective in deeper shadow box pieces.

    Layered Paper Shadow Box DIY

    • Layered Paper Art. Use the Cricut Design Space software to design your own layered artwork piece or purchase one off Etsy. Cut these shapes on your Cricut machine using an assortment of cardstock colors and add them to a dimensional shadow box for your child’s room

    Thanksgivng Gather Wreath Frame

    Fall Mantle Decor with Cricut Projects

    • Create a painted acrylic focal piece. Peel the protective covering from one side of an acrylic sheet and paint with acrylic paint to add some color to your home. Cut a phrase or design of choice on your Cricut on adhesive vinyl and adhere it on the other side of the acrylic. These make great centerpieces for a mantle collection, like this autumn-themed piece or used as an entrance sign for a wedding or baby showers.

    Reverse Canvas Cricut Decor Idea

    • Apply vinyl on a canvas. Choose a sentimental phase, like your wedding vows, an iconic design to match a nursery, or a trendy icon like a palm leaf and apply to a canvas using iron on vinyl. Step any rectangular or square canvas design up a notch and frame using a canvas frame of your choice.

    Cricut DIY Supplies

    Need more Cricut tips before you get started? Check out this Beginner Dos and Don’ts list and list of additional supporting tools that will help your creative crafting process.

    10+ Cricut Home Decor Projects


    About The Author

    Tara Nehil Headshot Tara Nehil is author of SpotOfTeaDesigns.com, a lifestyle blog sharing home décor, crafts, party inspiration and parenting lessons learned the hard way. Her graphic design background is evident in the home she lives in and styles with her husband and 2 young daughters. Follow her creative journey for photo tutorials, printables, budget-friendly decorating tips and ways to celebrate occasions big and small.
  • Recipe Card Shadow Box

    September 07, 2022

    No one makes a cheesecake quite like dear old Mema! If you’re lucky enough to get that recipe from her, especially one handwritten in her special cursive style, you may want to commemorate it in a shadow box in your kitchen space. Our Gilbert shadow box, like all our shadow box frames, includes a UV-resistant acrylic which will protect this irreplaceable piece of family history.

    Recipe Card Shadow Box Supplies

    Supplies:

    • Gilbert Shadow Box with Cocoa Suede backer
    • Patterned Paper
    • Recipe cards
    • Baking accessories: measuring spoons, cookie cutters
    • Hot Glue

    Recipe Card Shadow Box Step 1

    While you might be up for framing this piece of family history now, you might want access to these recipe cards in the future. Create your own photo corners by using acid-free patterned paper. Cut strips into ½-inch x 2-inch pieces. Fold the two ends underneath to form a triangle shape, as shown. Slip these pieces on the corner of each recipe card.

    Recipe Card Shadow Box Step 2

    To mount the cards in the shadow box apply adhesive on the back of the photo corners only and add to your shadow box backer. Arrange to allow for room for other accessories to add some character and tell a story. The great part about a shadow box is the depth that allows you to add three-dimensional elements to it!  

    Recipe Card Shadow Box Step 3

    Adhere accessories, such as vintage cookie cutters or measuring spoons to the frame using hot glue. Bonus if they’re actually from the recipe writer themselves!

    Recipe Card Shadow Box

    Mount in the frame with the UV acrylic held in front which will stop it from fading or being discolored.

    Recipe Card Shadow Box

    Recipe Card Shadow Box Close Up

    Display this shadow box in the place where recipes are made and add it to your kitchen display for an easy read when making that famous Mema cheesecake!

    Recipe Box Shadow Box Tutorial Pinterest


    About The Author

    Tara Nehil Headshot Tara Nehil is author of SpotOfTeaDesigns.com, a lifestyle blog sharing home décor, crafts, party inspiration and parenting lessons learned the hard way. Her graphic design background is evident in the home she lives in and styles with her husband and 2 young daughters. Follow her creative journey for photo tutorials, printables, budget-friendly decorating tips and ways to celebrate occasions big and small.